Follow the instructions below to adjust and/or replace your insect screen rollers. The 100 Series gliding patio door uses the same rollers for the top and bottom of the screen.
Replacing 100 Series Gliding Insect Screen Rollers
Below are the instructions for replacing the 100 Series insect screen rollers. Review the link below for replacement rollers.
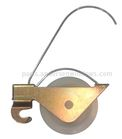
Insect Screen Rollers 
Firmly grip the roller with your thumb and index finger.
Push down on the roller to disengage the metal hook.
Pull the roller toward the center of the insect screen until the roller disengages and comes loose from the insect screen.
Insert the new roller into the pocket within the insect screen frame by reversing the movements made in step 3.
Pull up on the roller to engage the metal hook. The roller is now snapped into place.
Insect Screen Roller Adjustment
Tools/Supplies Needed
Safety Glasses
Screwdriver
To adjust the insect screen panel for a tighter fit, increase roller tension by turning the adjustment screw clockwise.
To adjust the insect screen panel for a looser fit, decrease roller tension by turning the adjustment screw counter-clockwise.
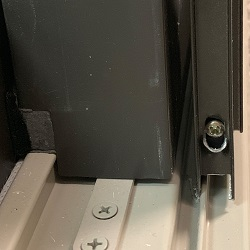
Adjustment Screw
If you have a broken insect screen roller or adjusting your rollers did not help, then you may need to order replacement rollers.
For additional assistance please Contact Andersen® Windows and Doors or a local Service Provider, see Locating Andersen® Window and Patio Door Service Providers.
©2026 Andersen Corporation. All rights reserved.