The hinge on your patio door can be adjusted to resolve several common operational problems caused by normal building settlement. The purpose of these adjustments is to eliminate interference between the patio door panel and the unit frame by squaring the patio door panel within the unit frame.
This article contains instructions for adjusting the hinges vertically and horizontally.
Hinge Adjustments
Check the clearance between the patio door panel and the unit frame. To begin, open and close the patio door several times. Does the patio door panel rub against the unit frame? Is the patio door panel squared in its frame? If the patio door rubs against the frame or is not square, adjustments are needed.
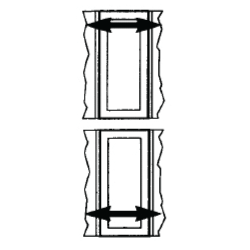
Horizontal adjustments will move or twist the door to the left or right. Vertical adjustments will move the door up or down.
Before you start, verify the Position Fixing Screws on all hinges are tight. Reference Horizontal Step Five (5) and Horizontal Step Six (6), then check door operation. Apparent adjustment problems may be corrected by simply tightening the Hinge Position Fixing Screws.

Tools/Supplies Needed
Safety Glasses
5/32" Hex Wrench 
Adjustment Screws
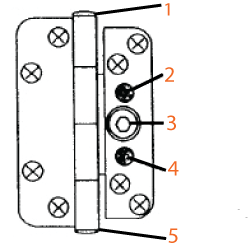
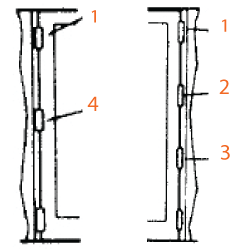
Review the names and locations of screws used to adjust the hinges.
 |
-
Upper Vertical Adjustment Screw
-
Horizontal Adjusting Screw
-
Position Fixing Screw
-
Horizontal Adjusting Screw
-
Lower Vertical Adjustment Screw
|
Horizontal Adjustments (Side to Side)
Start with the horizontal adjustment first, the vertical adjustments are rarely needed.
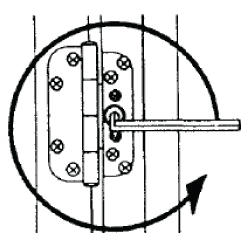
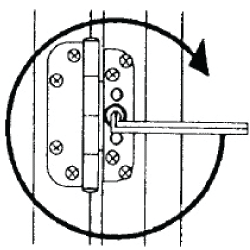
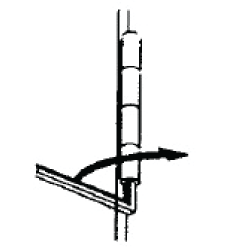
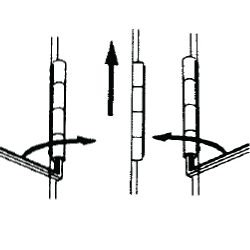
- Identify which hinge is not square: Start with the top hinge if the top of the patio door is not square. Start with the bottom hinge if the bottom of the patio door is not square. Horizontal adjustments are made by pivoting the door on the top or bottom hinge
|
Identify Which Hinge
|
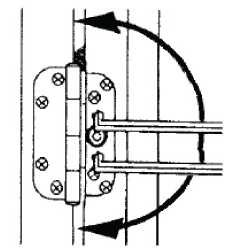
Move top hinge left or right
Move top hinge left or right
|
- Hinges to be adjusted, loosen the position fixing screws. Turn counterclockwise two (2) to four (4) full turns
Position Fixing Screws
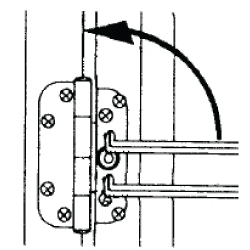
- Top or Bottom Hinge Adjustment: Turn both Horizontal Adjusting Screws. Half turns will move the patio door 1/16". Counterclockwise to decrease clearance between the door and frame on the lock side. Clockwise to increase clearance between the door and frame on the lock side
Horizontal Adjusting Screws
- Adjust middle hinges to a proportional number of turns
|
Three (3) Hinge Door and Four (4) Hinge Doors
|
-
Top Hinge Adjusted
-
2/3 of Top
-
1/3 of Top
-
1/2 of Top
|
-
Tighten the position fixing screws on all hinges: Tighten the position fixing screws by turning clockwise. Check both screws
Position Fixing Screw
-
Check the tightness of the Horizontal Adjusting Screws of all hinges. Turn counterclockwise until snug
Horizontal Adjusting Screws
Vertical Adjustment
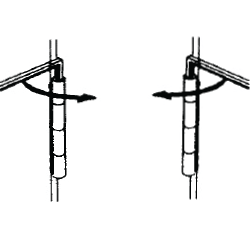
Adjust Down - Lower Patio Door Panel
Adjust with the door panel slightly open.
-
Bottom and Middle Hinges: Release the Lower Vertical Adjustment Screws. Turn as far as possible without forcing
-
Top Hinge: Turn the Lower Vertical Adjustment Screws to move the patio door panel down. Turn slowly until the patio door panel is centered in the frame. Jump to Vertical Equalize Step Three (3)
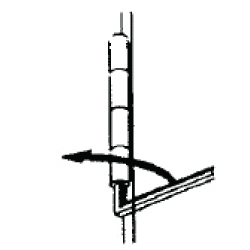
Lower Vertical Adjustment Screw
Adjust Up - Raise Patio Door Panel
Reseat the Upper Vertical Adjustment Screw.
-
All Hinges: release the Upper Vertical Adjustment Screw. Turn the Upper Vertical Adjustment Screws as far to the right as possible without forcing
-
Bottom Hinge: turn the lower Lower Vertical Adjustment Screw to move the patio door panel up. Slowly turn until the patio door panel is centered in the frame
Lower Vertical Adjustment Screw
- Equalize the load on the remaining hinges. Turn the Lower Vertical Adjustment Screw to the right until the patio door panel just begins to move up. Then turn it back to the left 1/4 turn. The patio door should be supported equally by all hinges
Lower Vertical Adjustment Screw
- Reseat the Upper Vertical Adjustment Screw. Turn the Upper Vertical Adjustment Screw to the left until slight contact is felt. Then turn back to the right 1/4 turn. The patio door should be supported equally by all hinges. Caution do not overtighten; hinges will bind and may be damaged if the Upper Vertical Adjustment Screws are too tight.
Upper Vertical Adjustment Screw
Operational Check
-
Open and close the door panel several times.
-
Check clearance between the door panel and the door frame. The door panel should not rub on the door frame when the door is squared in its frame, Horizontal Step One (1)
-
Check the tightness of the Position Fixing Screws, reference Horizontal Step Five (5) and Horizontal Step Six (6)
-
Check for smooth hinge operation. The door panel rides equally on all hinges Vertical Equalize Step Three (3). Upper Vertical Adjustment Screws do not bind, Vertical Reseat Step Four (4)
Operational Adjustments Reset Hinges to Factory Settings
-
Loosen Position Fixing Screws, Horizontal Step Two (2)
-
Turn both Horizontal Adjusting Screws counterclockwise as far as the screws will turn, Horizontal Step Three (3)
-
Turn both Horizontal Adjusting Screws clockwise 1 full turn to set the Hinge at the approximate midpoint
-
Tighten Position Fixing Screws, Horizontal Step Five (5)
-
Perform the Operational Check to determine the need for further adjustments
If the hinges will not adjust, purchase new replacement hinges, see Replacement Hinges for 400 Series Frenchwood® Hinged Inswing Patio Doors.
If these steps have been performed and the issue persists, Contact Andersen® Windows and Doors or see Locating Andersen® Window and Patio Door Service Providers for further assistance.
©2024 Andersen Corporation. All rights reserved.