The 100 Series gliding window uses rollers to open and close. Adjusting the gliding window sash will keep the window working smoothly and may also resolve any operational issues.
Replacement Parts
There are two (2) roller assemblies on the bottom of each active window sash. Review the link below if new parts are needed.
Roller Assembly 
Adjusting Gliding Window Sash
Tools/Supplies Needed
Safety Glasses
Gloves
Flat Blade Screwdriver

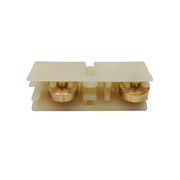
Bottom of Sash - Roller Assembly
Unlock and open the active window sash until it clears the sash stop in the head jamb.
Firmly grasp the sash, lift up and swing out from the bottom inward to remove the sash.
Turn the sash to expose the roller assembly.
Remove metal rollers using a flat-bladed screwdriver. Only the metal rollers will be taken out and not the whole plastic assembly.

Plastic Assembly: No Rollers Shown - Orange Locations: High / Low / High / Low
Choose a new location for the rollers. The factory setting is low, try moving to high.
Snap rollers into place using your fingers.

Factory Setting - Set to Low

Adjustment Made - Set to High
Installation
Review the installation guide for the removal of the sash and adjustment of the rollers, Sash and/or Roller Replacement for Andersen® 100 Series Gliding Windows (9000598)  .
.
©2026 Andersen Corporation. All rights reserved.