Have you noticed your hinged patio door doesn't open or close as seamlessly as it used to? Don't worry, a few minor adjustments to the adjustment screws on the hinges of your 400 Series Frenchwood® Hinged Patio Door, manufactured from 1989 to 1991, can return your door to its seamless operation.
How to Adjust Hinge Adjustment Screws
Specific screws on your patio door's hinge, called adjustment screws, can be slightly rotated to resolve common operational problems like the door rubbing against the frame when you open and close it. Adjusting the adjustment screws will decrease friction between the patio door and its frame. Slight screw adjustments can help square the patio door panel within its frame.
As shown in this diagram, hinged patio door hinges feature functional screws that attach it to the door frame and adjustment screws, which are identified below.

Diagram to Identify Hinge Adjustment/Adjusting Screws on a Hinge
When to Use This Article
To help maintain proper operation, inspect the condition of your hinges and clean them at least once per year. If you live in a coastal, industrial, or agricultural area with higher levels of airborne material like dirt, dust, smoke, and salt spray, we recommend following these instructions at least every three (3) months.
Misaligned hinges can cause:
- Stiff or difficult handle and lock operation.
- Weatherstrip rubbing on the frame or panel.
This Article Will Help You:
Safety Warning

Tools and Supplies Needed
- Safety glasses
- 5/32-inch hex wrench
Let's Get Started
Check Operation
- Open and close the door several times.
- Do you see any friction points where the door might be rubbing against the frame? If it is rubbing against the frame, the door is not properly square.
- Check the tightness of the position fixing screws. To identify your position fixing screw, see Number Three (3), in the identify screws diagram above and refer to step five (5) under Adjust the Horizontal Adjusting Screws to tighten it.
- Open and close the door several times again.
- Still seeing the door rubbing against the side of the frame? Follow the steps outlined in Adjust the Horizontal Adjusting Screws below.
- Still seeing the door rubbing against the top or bottom of the frame? Follow the steps outlined in Adjust the Vertical Adjustment Screws below.
Note: Adjusting the horizontal adjusting screws will reposition the door to the left or right, while adjusting the vertical adjustment screws will reposition the door up or down.
Adjust the Horizontal Adjusting Screws
If you notice the top or bottom of the patio door is crooked, you will adjust the horizontal adjusting screws by following the steps below. Turning horizontal adjusting screws in half turns will reposition the patio door by 1/16 inch.
Note: Counterclockwise turns will push the door away from the hinge-side of the frame. Clockwise turns will pull the door closer to the hinge-side of the frame.
|
1.Identify which part of your door is askew in the frame.
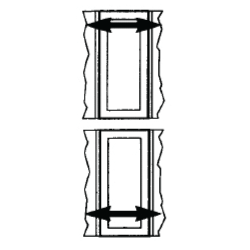
Identify Top or Bottom Hinge
|
Step One (1) Example:
To shift the top hinge left or right on a three (3) hinge door:
To shift the bottom hinge left or right on a three (3) hinge door:
|
|
2. On that hinge, turn the position fixing screws counterclockwise two (2) to four (4) turns.
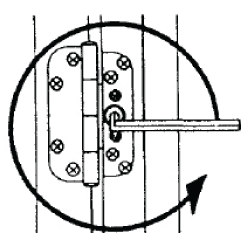
Rotate Position Fixing Screw Counterclockwise
|
3. Turn both of the horizontal adjusting screws as needed on the hinge you've identified as crooked.
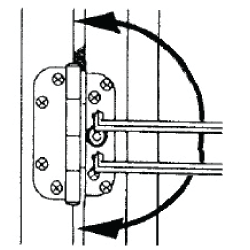
Rotate Horizontal Adjusting Screws Counterclockwise or Clockwise
|
|
4. Adjust the middle hinges proportionally based on how much you adjusted the top or bottom hinge.
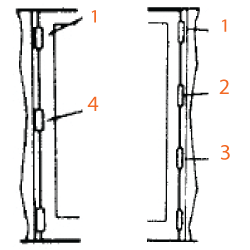
Left: Diagram of a Three (3) Hinge Door. Right: Diagram of a Four (4) Hinge Door
|
Step Four (4) Example:
- Adjust Top Hinge as needed.
- Adjust hinge 2/3 the amount of adjustment made to hinge 1.
- Adjust hinge 1/3 the amount of adjustment made to hinge 1.
- Adjust hinge 1/2 the amount of adjustment made to hinge 1.
|
|
5. Tighten the position fixing screws on all hinges by turning them clockwise.
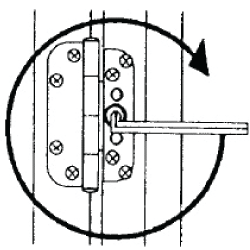
Turn Position Fixing Screw Clockwise
|
6. Tighten the horizontal adjusting screws by turning them counterclockwise until they are snug.
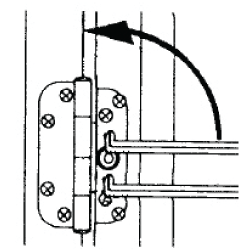
Turn Horizontal Adjusting Screws Counterclockwise
|
Adjust the Vertical Adjustment Screws
Depending on whether your door is rubbing against the bottom or top of the frame, you will adjust either the upper or lower adjusting screws on your hinge to raise or lower the door. See Number One (1) and Number Five (5) in the identify screws diagram above.
Important: Do not over tighten hinges. Hinges may bind or be damaged if the upper vertical adjustment screws are too tight.
| To lower your door, follow steps one (1) and two (2), then proceed to steps three (3) to six (6). | To raise your door, follow steps one (1) and two (2), then proceed to steps three (3) to six (6). |
|
1. On the bottom and middle hinges, turn the lower vertical adjustment screw counterclockwise as far as possible without forcing.
2. On the top hinge, slowly turn the lower vertical adjustment screw counterclockwise until the door is centered within the frame.
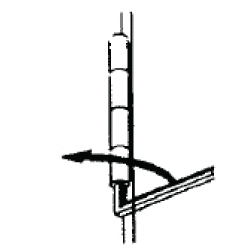
Turn the Lower Vertical Adjustment Screw Counterclockwise
|
1. On the all hinges, turn the upper vertical adjustment screw clockwise as far as possible without forcing.
2. On the bottom hinge, slowly turn the lower vertical adjustment screw clockwise until the door is centered within the frame.
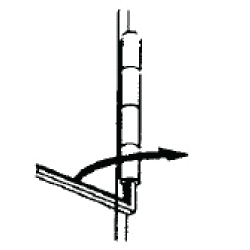
An Illustration of Step Two (2), Adjust Bottom Hinge
|
|
3. Equalize the load on the remaining hinges by turning the lower vertical adjustment screws clockwise until the patio panel just begins to move up.
|
4. Then turn it back, counterclockwise, by 1/4 turn.

Left: Illustration Describing Step Three (3); Right: Illustration Describing Step Four (4)
|
|
5. Reseat upper vertical adjusting screws by turning the upper vertical adjustment screws counterclockwise until slight resistance is felt.
|
6. Then turn it back, clockwise, by 1/4 turn.

Left: Illustration Describing Step Five (5); Right: Illustration Describing Step Six (6)
|
Reset Hinges to Factory Settings
If adjusting the hinges has not resolved the concern, patio door hinges manufactured between 1989 to 1991 can be reset to the factory setting. We recommend attempting to adjust horizontal and vertical hinge adjustment screws before trying to reset hinges to the factory settings.
- Loosen the position fixing screw, see step two (2) under Adjust the Horizontal Adjusting Screws.
- Turn both the horizontal adjusting screws counterclockwise as far as the screws will turn, see step three (3) under Adjust the Horizontal Adjusting Screws.
- Turn both the horizontal adjusting screws clockwise one (1) full turn to set the hinge.
- Tighten the position fixing screws, see step five (5) under Adjust the Horizontal Adjusting Screws.
- Check operation of the door to determine if further adjustments are needed.
Related Articles
Even though we do not have video instructions for hinge adjustments on 1989 to 1991 hinged patio doors, see Adjust Hinges on Frenchwood® Hinged Inswing Patio Doors (Made Before Nov. 2005). Again, the video does not describe the instructions above, but provides a good visual on how hinge adjustments will shift a door within its frame.
If the hinges do not adjust, we recommend you replace them. See Replace Hinges on 400 Series Frenchwood® Hinged Inswing Patio Doors for more details.
If you perform these steps and the door continues to rub against its frame, Contact Andersen® Windows and Doors or see Locating Andersen® Window and Patio Door Service Providers for additional assistance.
©2026 Andersen Corporation. All rights reserved.