If your Andersen® window's interior grilles, the ornamental bars applied to window glass that create a pattern, are unfinished maple or oak, they can be stained to a different color in a few quick steps.
How to Stain Unfinished Wood Interior Grilles
This article provides instructions for staining unfinished wood grilles.
Important: Use these instructions to stain only the interior side of your grille visible from inside your home. The exterior side of the grille is already painted to match the exterior finish of your window frame and should not be refinished. Refer to the technical image below for assistance in identifying the interior and exterior sides of a grille.
Similarly, if the interior side of the removable grille is painted on both the exterior and interior surfaces, do not follow the steps below since no further finishing is required.
|

Andersen Picture Window with Colonial-Style Grilles
|
In the image below, the top grooved side of the grille is the interior side; the bottom flat side is the exterior side. The flat side will normally be pressed against the window and painted to match the exterior window frame. Do not stain or paint it.
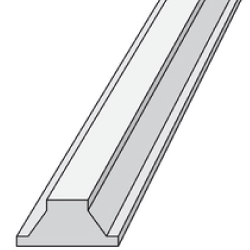
The Profile of Interior Removable Grille
|
Note: We recommend you always stain removable grilles before installing them on Andersen® products.
Depending on when your window was manufactured, interior grilles can be made of different materials. While wood interior grilles are standard for the majority of Andersen products, if you're unsure which type of grilles you have, Contact Andersen® Windows and Doors for assistance.
This Article Will Help You:
- Stain the interior side of wood grilles.
Safety Warnings
Tools and Supplies Needed
- One (1) soft cleaning cloth
- 220-grit and 200-grit* sandpaper or steel wool
- Tack cloth
- Safety glasses
- Pre-stain wood conditioner
- High-quality, oil-based wood stain
- Wood sealer (any conventional lacquer, varnish, or polyurethane)
*Optional, see information underneath step seven (7) below.
Let's Get Started
Stain the Interior Side of Wood Grilles
Follow the instructions below to properly stain the interior side of removable wood grilles for your Andersen product.
-
Remove the grilles by following the instructions in Replace Grille Fasteners on Andersen® Windows and Doors.
- Use 220-grit sandpaper or steel wool to lightly sand the interior side of the grilles, which is the side of the grille that is visible from inside your home when they're installed.
- Wipe off any dust from the grille using the tack cloth.
- Apply the pre-stain following the manufacturer's instructions.
- We recommend pre-stain to prevent a spotty appearance.
- Apply the high-quality, oil-based wood stain, following the manufacturer's instructions, in a well-ventilated area. Note: Try to prevent the stain from getting on the flat side of the grille.
- Allow the stain to dry overnight before finishing again.
- Seal the wood using thinned finishing material or wood sealer, following the manufacturer's instructions. Note: You can use any quality, conventional lacquer, varnish, or polyurethane to seal the wood.
- If a second coat of wood sealer is needed, lightly sand the grilles between coats using 200-grit sandpaper.
Related Articles
For information on matching Andersen® Window and Patio Door stain and paint colors, see Matching Andersen® Window and Door Stain and Paint Colors.
For additional instructions related to staining wood, see Stain Andersen® Products with Unfinished Wood Interior Surfaces.
©2026 Andersen Corporation. All rights reserved.